Create a Birthstone Pendant and learn how to facet a stone using scrap silver in our latest project by Tori Foster
Tools and Materials needed:
Beginners Tool Kit
Starter Soldering Kit
Third Hand Base
Steel Bench Block
Leather Sand Bag
Hammer
Brass Brush
Emery Papers from 240 grit
Lobster Claw
Oval Belcher Chain
Scrap Sterling Silver (clean scrap, no solder)
Square End Pusher
Curved Burnisher
Light 5mm Jump Rings (minimum of 2 for clasp)
A bail, a jump ring or 0.8 round wire is used in the examples
For the drilled hole with jump ring through you will also need:
Drill: 1mm bit with either a pendant drill or Dremel.
Centre Punch
Rawhide Mallet
For the cab pendant only:
Round cab 8-10mm (maybe a garnet for January’s birthstone or Amethyst for Feb’s birthstone)
Bezel wire DSF 603 x 50mm
Half Round Pliers
Plain Round Triblet
For the Flush set project only:
White Cubic Zirconia 3mm
Sterling Silver Tube Ref 4 x 10mm
Digital Vernier Gauge
3 in 1 oil
Stone Setting Burr 3.0mm
Swivel Pin Vice
Beeswax Block
Optional – Tube Cutter
How to create a Birthstone Cabochon Pendant using Scrap Silver
Step 1
Gather together clean scrap silver and place on your soldering block. How much you use will depend on the size of your stone and the end thickness of the pendant. Don’t be afraid to experiment, you can always melt it again! Use your torch to melt the silver, it should all ball up together. Allow to cool and pickle.
Step 2
Using a hammer, steel block and sand bag, hammer the silver ball flat. If you want to take it really thin, remember to anneal the metal as needed.
Step 3
Decide on the finish, I’ve filed the edge of the Garnet so it’s quite angular, the Topaz has a smoother finish and the Amethyst still has some of the hammer marks, I sanded where the bezel would go so that I would have a flat surface to ensure a good join.
Step 4
Using the bezel strip and half round pliers, form a circle roughly the size of the stone with an overlap. Shape this around the stone with a snug fit and mark where the metal overlaps. Cut through.
Step 5
Solder the bezel join, make sure your join is flush (it doesn’t need to be round at this point if that helps you get a good join) Place a hard solder pallion under the join, this helps stop the solder jumping when you apply heat. Heat all around before moving into the join until the solder flows. Pickle.
Step 6
Shape the bezel around your mandrel and check the fit around the stone. If it’s really loose you will have to cut it and resolder, if slightly too small you may be able to stretch it out by placing it on the mandrel and rolling it on a hard surface. Once happy with the size and shape, sand so the base is flat ready for soldering to the base.
Step 7
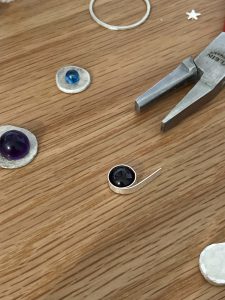
Solder to the base, again using hard solder. Apply flux and a few small pallions of solder to the inside of the bezel, right up to the bezel wall. Gently heat, concentrating on the base as it will take longer to heat. If your solder moves you can use a soldering probe to push it back into place. Pickle the piece once soldered. [pic5]
Step 8
Attach a bail. Depending on your preference you could:
Drill a hole for a jump ring to pass through – mark the location of the hole with a centre punch and hammer. Drill through with a 1mm drill bit. Twist open a jump ring, pass through and close, ensuring a good join.
Solder on a jump ring – you can either solder the jump ring closed first then solder to the pendant or do both at the same time, just be careful when doing this that you are sure the jump ring has joined to the pendant as well as soldering closed. File a small flat section to the jump ring and pendant for greater surface area. If you want the chain to pass directly through this jump ring, use your 3rd hand to hold the jump ring vertically and apply solder to the join, remember to heat the pendant first as it will take longer to heat. Make sure you check from all angles that you are happy with the placement. You could also solder the jump ring horizontally where you can lay both jump ring and pendant down. This may need an additional ring adding for the chain to pass through and allow the pendant to sit properly when worn.
Solder something decorative – for the amethyst, I hammered a piece of wire to echo the hammer marks on the sheet metal and soldered this to the back.
Step 9
Clean up – make sure all joins are free of excess solder using files and emery paper. Polish as desired – I just used a brass brush as I didn’t want anything too shiny.
Step 10
Set your stone – make sure the top of the bezel is level and the correct height, too high and it will cover up the stone and might lead to a bumpy finish. Sand down if necessary. Once happy, pop the stone in. Using the square pusher, push the bezel wall up and over without hitting the stone. Do this in opposite directions (if you imagine a compass, it would be North, South, East, West) this should give you a slightly square bezel. Go back in and do the corners, again working at opposites. You can then start to work around the stone, making sure it is all smooth and there is no movement of the stone. If there is, keep pushing.
Step 11
Once you are happy, take the burnisher and burnish the edges of the bezel to smooth off.
Step 12
Clean up any marks from setting then pass a chain through the jump ring and add a clasp and jump ring to the ends. [pic10]
How to Tube Set a Faceted Stone
Step 1
Create the base, steps 1-3 as above.
Step 2
Cut a piece of tubing, the size listed is perfect for a 3mm stone, for other stone sizes you would need the inner diameter to be slightly smaller than the stone and the outer to be slightly larger so you have enough metal to push over when setting. The cut tube needs to be bigger than the height of the stone so use your callipers to measure this. Place the stone flat on the edge of the callipers and close the jaws. When setting we will be burring down into the metal so allow a few extra mm for this. You could go as tall as you want or have several stones set at different heights. You can use the callipers to make a mark on the tube as a cutting guide. Using the tube cutter makes it much easier as it holds the tube in place and has a guide but you can get by without one.
Step 3
Make sure the tube ends are straight, file if not and then solder to the base as above, making sure to concentrate the heat on the base.
Step 4
Attach a bail
Step 5
Clean up and polish as desired.
Step 6
Set your stone – the setting burr needs to match the size of the stone. Dab it in a little bit of 3-in-1 oil and place vertically into the tube, keep the burr as straight as possible so you cut an even seat. Twist the pin vice and begin to burr out the metal in the tube, don’t press too hard or you can jam the burr, too light and you’ll be there a while! You should start to see little bits of metal being removed, wipe these away often, use a dental brush to get into the tube and keep that clean.
Step 7
Once you’ve got started, check the setting with the stone, if you go too deep, you’ll have lots of metal to push over and this will cover up too much of the stone. Pick up the stone using the corner of your beeswax and drop into the tube. The top of the tube should cover the girdle (the widest point of the stone) but not the top of the stone.
Step 8
When you are happy with the setting, use the square pusher to push the metal over the stone, working in opposites as above and making sure the stone sits level after each push. Work around with the burnisher to smooth off and sand away any marks made from setting. Add your chain and clasp
Written by Tori Foster
The post Create a Scrap Silver Pendant by Tori Foster appeared first on The Bench.
 Robert Connelly GG (GIA), GD, AGA, NAJA, ISA AM has examined and appraised several thousands of pieces of exquisite jewelry the world over since beginning his exploration of the jewelry industry in 1989 as an international wholesale buyer and seller in Brazil and United States. A Graduate Gemologist finishing with at the top of his class with a 97% rating from the Gemological Institute of America in Carlsbad, CA, he established AZ JEWELRY APPRAISERS in 2013 to serve a complete array of appraisal needs within the Phoenix, Tucson and Flagstaff areas following an educational global odyssey in gemology.
Recent Comments